Accessory Manager
The Accessory Manager lets you configure all the devices connected to your SmartCore inputs, outputs and the DALI bus. Click the (+) button to add a new accessory and select the accessory type.
Adding a Device
- Go to Accessory Manager
- Click the + icon
- Select the device type
- Enter a name for the accessory
- Assign the relay output or input where the device is connected
- Configure any additional settings for the accessory
- Click Save Configuration once all accessories are added
- Reboot the device
Quick links
| Lighting & Power | Blinds & Shutters | Climate | Sensors | Security & Access |
|---|---|---|---|---|
| DALI Light | Window Covering | Valve | Contact Sensor | Garage Door |
| Lightbulb | Motion Sensor | Lock | ||
| Outlet | Occupancy Sensor | |||
| Programmable Switch | ||||
| Switch |
Lighting & Power
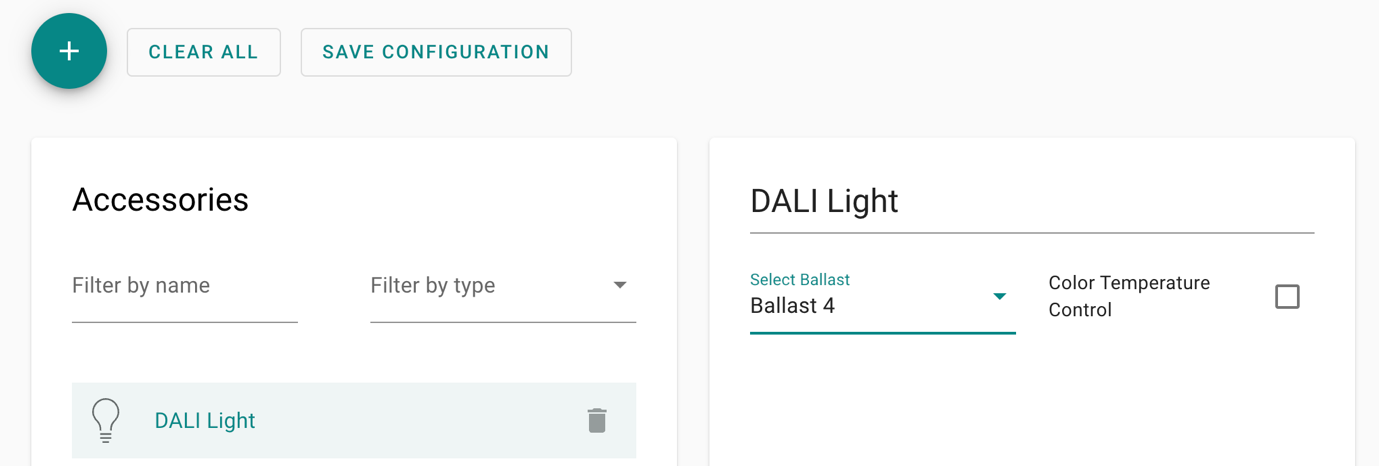
DALI Light
Control DALI lighting ballasts with individual addressing and dimmable control.
Setup
- Open the Web Interface by accessing your SmartCore here and navigate to Accessory Manager.
- Click the (+) button to add a new accessory.
- Select DALI Light as the accessory type.
- Enter the DALI address of the ballast you want to control (for example, address 4 for a dimmable ceiling lamp).
- If controlling multiple DALI ballasts, commission each one with unique DALI addresses first.
- Configure the DALI bus power source (see below).
- Click Save.
DALI Bus Power
The DALI bus can be powered in two ways, but not both:
- External power supply connected to the DALI bus
- Integrated power supply built into the SmartCore
Choose one power source depending on your installation setup. Do not connect both at the same time.
Lightbulb
Control lights connected to your SmartCore relay outputs.
Setup
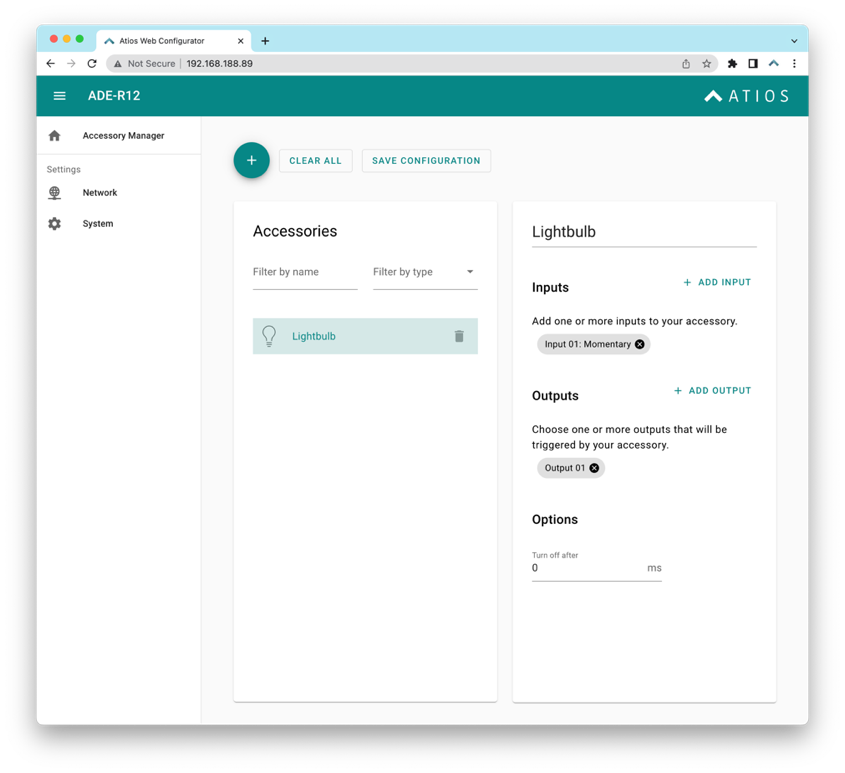
- Open the Web Interface by accessing your SmartCore here and navigate to Accessory Manager.
- Click the (+) button to add a new accessory.
- Select Lightbulb as the accessory type.
- Assign the relay output where your light is connected (for example, Relay 1).
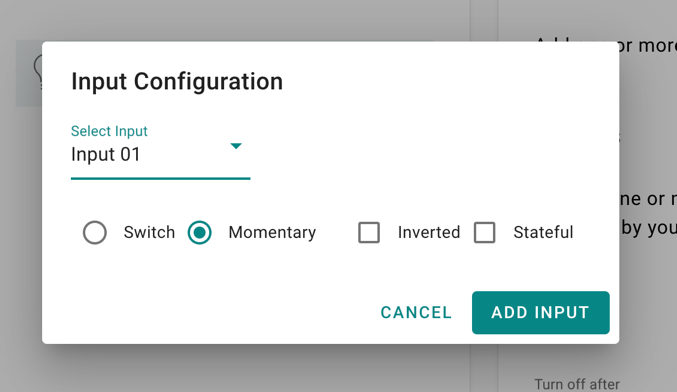
- Optionally assign input controls. One input can trigger multiple outputs, or multiple inputs can control the same light.
- Configure any additional settings (see below).
- Click Save.
Additional Settings
| Setting | Description |
|---|---|
| Input Switch | Constant HIGH until pressed again, reacts on both changes |
| Input Momentary | Momentary HIGH until released, reacts only LOW to HIGH |
| Input Inverted | Reacts HIGH to LOW instead of LOW to HIGH |
| Input Stateful | Only reacts LOW to HIGH, can be reversed with Inverted |
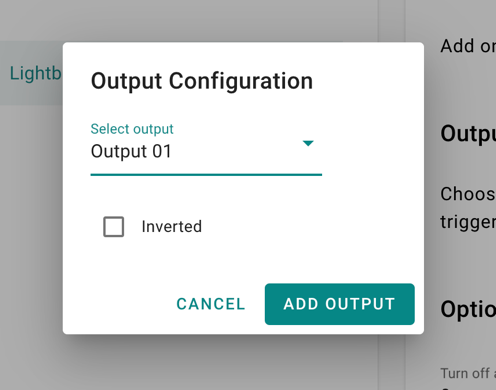
| Output Inverted | Inverts relay from Normally Open to Normally Closed |
| Turn off after | Time in milliseconds, auto switches off after delay |
Outlet
Control power outlets connected to your SmartCore relay outputs. Configuration is similar to Lightbulb.
Setup
- Open the Web Interface by accessing your SmartCore here and navigate to Accessory Manager.
- Click the (+) button to add a new accessory.
- Select Outlet as the accessory type.
- Assign the relay output where your outlet is connected (for example, Relay 1).
- Optionally assign input controls. One input can trigger multiple outputs, or multiple inputs can control the same outlet.
- Configure any additional settings (see below).
- Click Save.
Additional Settings
| Setting | Description |
|---|---|
| Input Switch | Constant HIGH until pressed again, reacts on both changes |
| Input Momentary | Momentary HIGH until released, reacts only LOW to HIGH |
| Input Inverted | Reacts HIGH to LOW instead of LOW to HIGH |
| Input Stateful | Only reacts LOW to HIGH, can be reversed with Inverted |
| Output Inverted | Inverts relay from Normally Open to Normally Closed |
| Turn off after | Time in milliseconds, auto switches off after delay |
Programmable Switch
Create custom switch controls that can be assigned in Apple Home to control other accessories or scenes.
Setup
- Open the Web Interface by accessing your SmartCore here and navigate to Accessory Manager.
- Click the (+) button to add a new accessory.
- Select Programmable Switch as the accessory type.
- Assign the input where your physical switch is wired (for example, Input 1).
- Configure any input settings (Input Momentary for single press, Input Inverted to reverse logic, Input Stateful for always-on state).
- Click Save.
Once created, you can open Apple Home and assign this switch to control other accessories or trigger scenes. Double and long press support coming soon.
Switch
Control switches connected to your SmartCore relay outputs. Configuration is similar to Lightbulb.
Setup
- Open the Web Interface by accessing your SmartCore here and navigate to Accessory Manager.
- Click the (+) button to add a new accessory.
- Select Switch as the accessory type.
- Assign the relay output where your switch is connected (for example, Relay 1).
- Optionally assign input controls. One input can trigger multiple outputs, or multiple inputs can control the same switch.
- Configure any additional settings (see below).
- Click Save.
Additional Settings
| Setting | Description |
|---|---|
| Input Switch | Constant HIGH until pressed again, reacts on both changes |
| Input Momentary | Momentary HIGH until released, reacts only LOW to HIGH |
| Input Inverted | Reacts HIGH to LOW instead of LOW to HIGH |
| Input Stateful | Only reacts LOW to HIGH, can be reversed with Inverted |
| Output Inverted | Inverts relay from Normally Open to Normally Closed |
| Turn off after | Time in milliseconds, auto switches off after delay |
Blinds & Shutters
Window Covering
Control motorized blinds and shades with directional up and down movement.
Setup
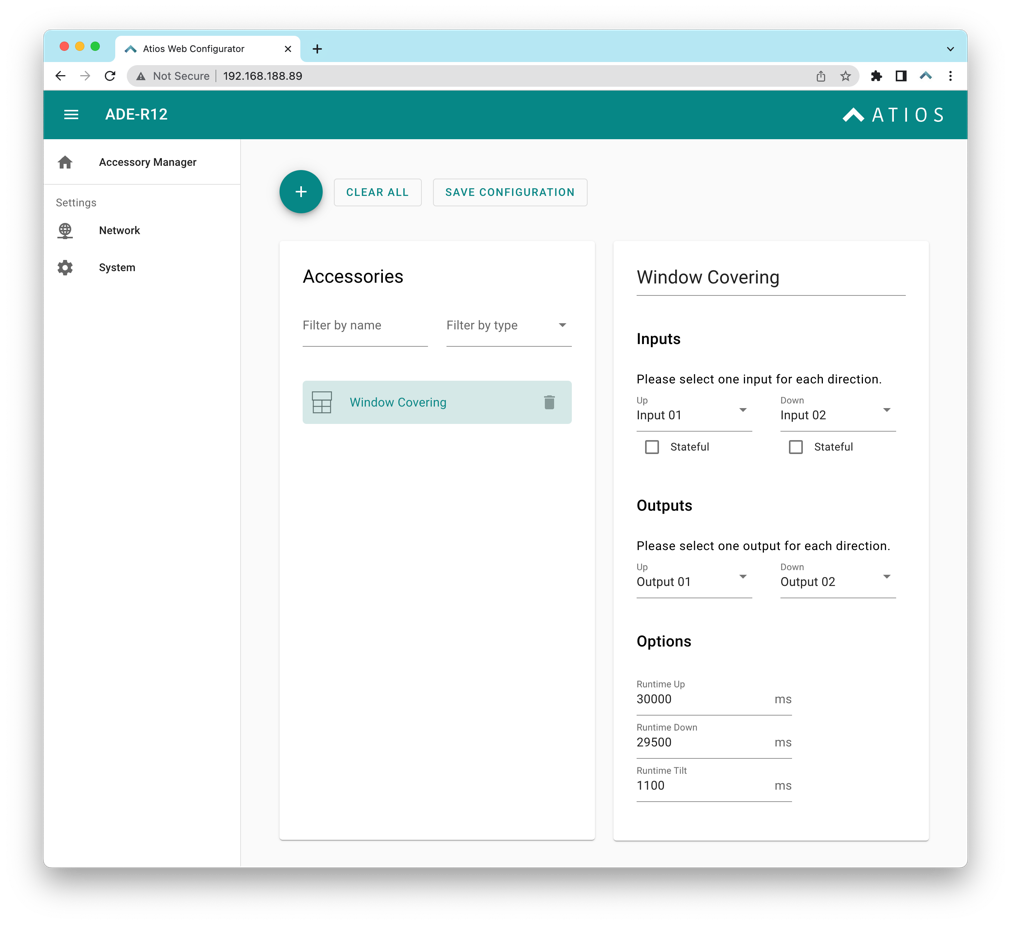
- Open the Web Interface by accessing your SmartCore here and navigate to Accessory Manager.
- Click the (+) button to add a new accessory.
- Select Window Covering as the accessory type.
- Assign two relay outputs, one for UP movement and one for DOWN movement (for example, Relay 1 and Relay 2).
- Optionally assign two input controls, one for UP and one for DOWN.
- If needed, invert motor direction by switching which relay controls UP and which controls DOWN.
- Configure timing and additional settings (see below).
- Click Save.
Additional Settings
| Setting | Description |
|---|---|
| Runtime Up | Time in milliseconds for the motor to fully open the covering |
| Runtime Down | Time in milliseconds for the motor to fully close the covering |
| RunTime Tilt | Time in milliseconds to tilt slats from -90 to +90 degrees, leave empty if no slats |
Climate
Valve
Control water valves and similar actuators connected to your SmartCore relay outputs. Configuration is similar to Lightbulb.
Setup
- Open the Web Interface by accessing your SmartCore here and navigate to Accessory Manager.
- Click the (+) button to add a new accessory.
- Select Valve as the accessory type.
- Assign the relay output where your valve is connected (for example, Relay 1).
- Optionally assign input controls. One input can trigger multiple outputs, or multiple inputs can control the same valve.
- Configure any additional settings (see below).
- Click Save.
Additional Settings
| Setting | Description |
|---|---|
| Input Switch | Constant HIGH until pressed again, reacts on both changes |
| Input Momentary | Momentary HIGH until released, reacts only LOW to HIGH |
| Input Inverted | Reacts HIGH to LOW instead of LOW to HIGH |
| Input Stateful | Only reacts LOW to HIGH, can be reversed with Inverted |
| Output Inverted | Inverts relay from Normally Open to Normally Closed |
| Turn off after | Time in milliseconds, auto switches off after delay |
Sensors
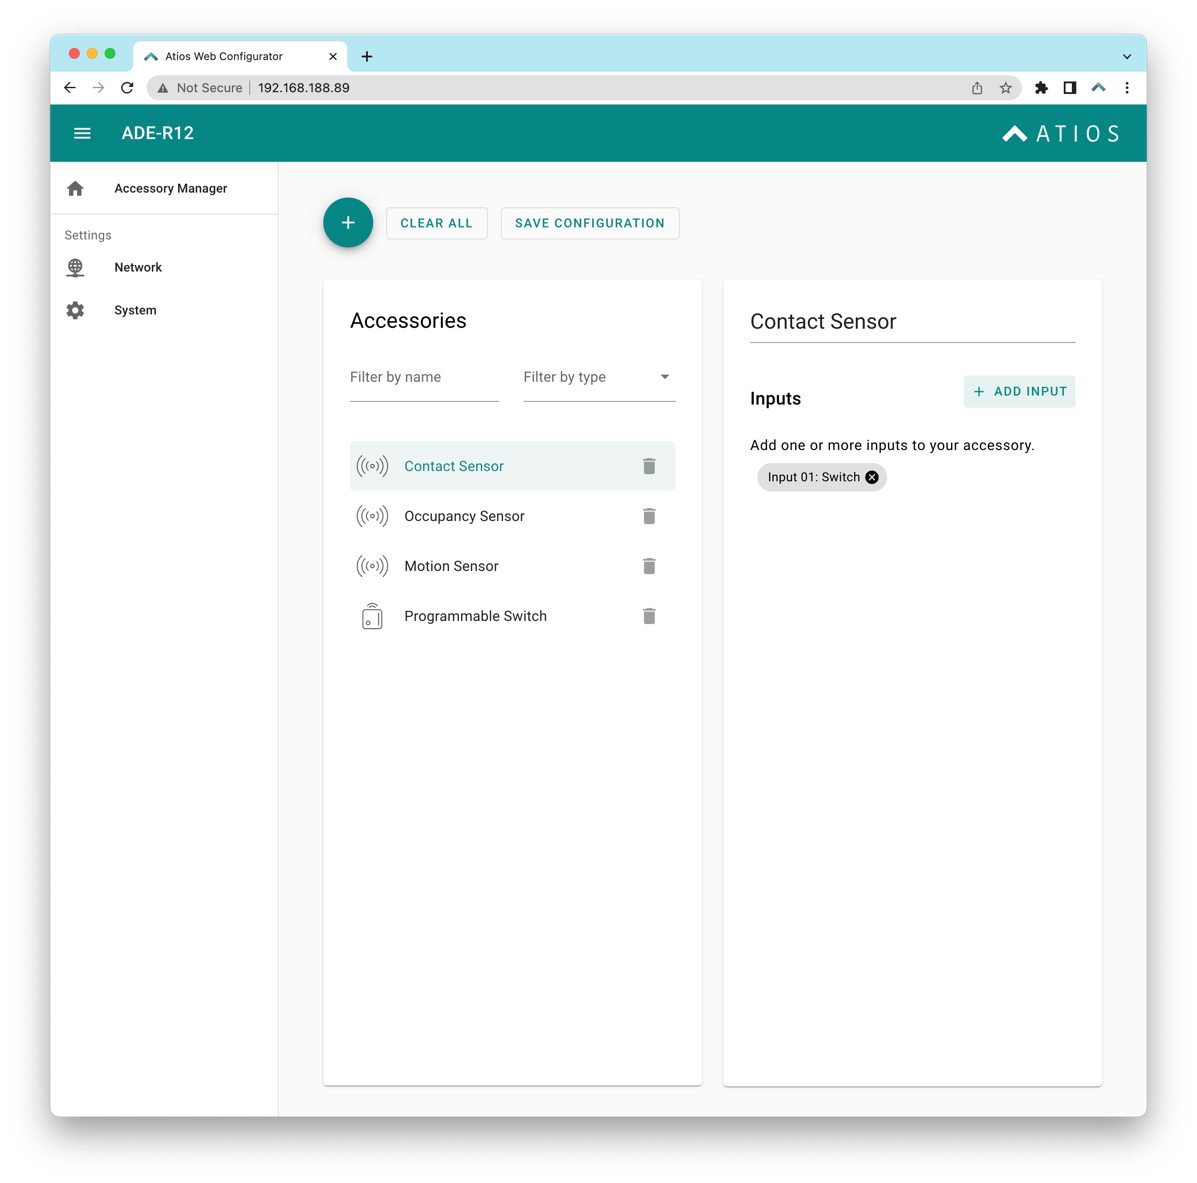
Contact Sensor
Detect door and window open or closed state with a contact sensor.
Setup
- Open the Web Interface by accessing your SmartCore here and navigate to Accessory Manager.
- Click the (+) button to add a new accessory.
- Select Contact Sensor as the accessory type.
- Assign the input where your door or window contact sensor is wired (for example, Input 1).
- Configure any input settings (Input Inverted to reverse open/closed logic, Input Stateful for always-on state detection).
- Click Save.
Your contact sensor will now report open or closed status in the Home App and other integrations.
Motion Sensor
Detect motion with a motion sensor.
Setup
- Open the Web Interface by accessing your SmartCore here and navigate to Accessory Manager.
- Click the (+) button to add a new accessory.
- Select Motion Sensor as the accessory type.
- Assign the input where your motion sensor is wired (for example, Input 1).
- Configure any input settings (Input Inverted to reverse motion/no motion logic, Input Stateful for always-on state detection).
- Click Save.
Your motion sensor will now report motion status in the Home App and can trigger automations.
Occupancy Sensor
Detect room occupancy with an occupancy sensor.
Setup
- Open the Web Interface by accessing your SmartCore here and navigate to Accessory Manager.
- Click the (+) button to add a new accessory.
- Select Occupancy Sensor as the accessory type.
- Assign the input where your occupancy sensor is wired (for example, Input 1).
- Configure any input settings (Input Inverted to reverse active/inactive logic, Input Stateful for always-on state detection).
- Click Save.
Your occupancy sensor will now report occupancy status in the Home App and can be used in automations.
Security & Access
Garage Door
Control garage door openers with impulse control and status feedback.
Setup
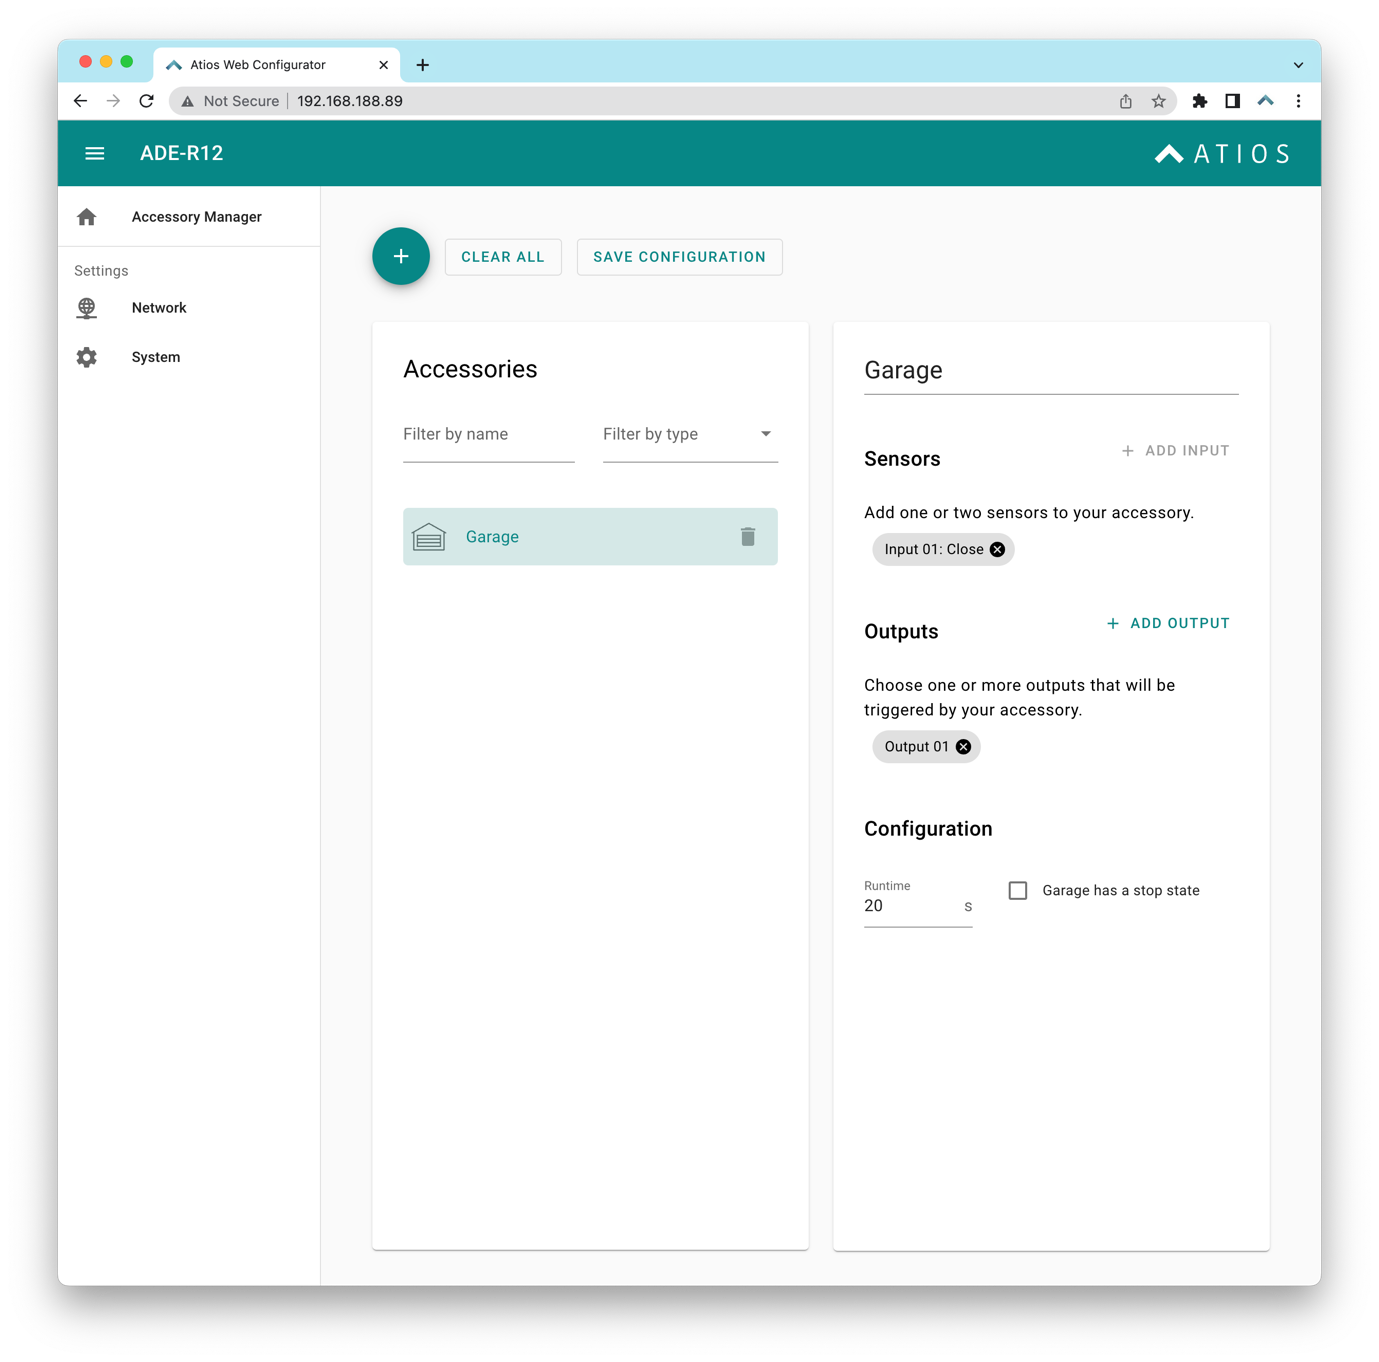
- Open the Web Interface by accessing your SmartCore here and navigate to Accessory Manager.
- Click the (+) button to add a new accessory.
- Select Garage Door as the accessory type.
- Assign one relay output for the impulse control that triggers the door opener (typically Relay 1).
- Assign one or more input controls for door sensors. A magnetic reed contact on an input detects open or closed state.
- If you have a single sensor, enter the time in seconds for the door to fully open. The system will auto-compute status using this runtime.
- Configure additional settings (see below).
- Click Save.
Additional Settings
| Setting | Description |
|---|---|
| Runtime | Time in seconds for the garage door to fully open, status is auto-computed using this value and sensor feedback |
| Stop State | Enable this checkbox if your garage changes between OPENING, STOPPED, and CLOSING states with each button press |
Lock
Control motorized door lock actuators.
Setup

- Open the Web Interface by accessing your SmartCore here and navigate to Accessory Manager.
- Click the (+) button to add a new accessory.
- Select Lock as the accessory type.
- Assign the relay output where your lock actuator is connected (typically Relay 7).
- Set Output Inverted to convert the relay from Normally Open to Normally Closed.
- Configure additional settings (see below).
- Click Save.
Additional Settings
| Setting | Description |
|---|---|
| Inching lock time | Time in milliseconds, relay automatically turns off after this delay |
| Doorbell Input | Assign a doorbell input to send Home App push notifications and play doorbell sound on HomePods |